Ever wanted to use git without the command line?
If these terms are unfamiliar try reading git basics.
Rangle Git Flow
At Rangle we focus on effective code management throughout a project's development cycle. In order to manage code effectively it is important to follow a few guidelines:
- Start by forking project
- Create a new branch for each feature or bug fix
- Make pull request for each change
WebStorm Git Flow
Forking a remote repository
Within Github or Bitbucket find the project you will be working with and create a fork.
How to sync a fork to a remote repository
Do the following:
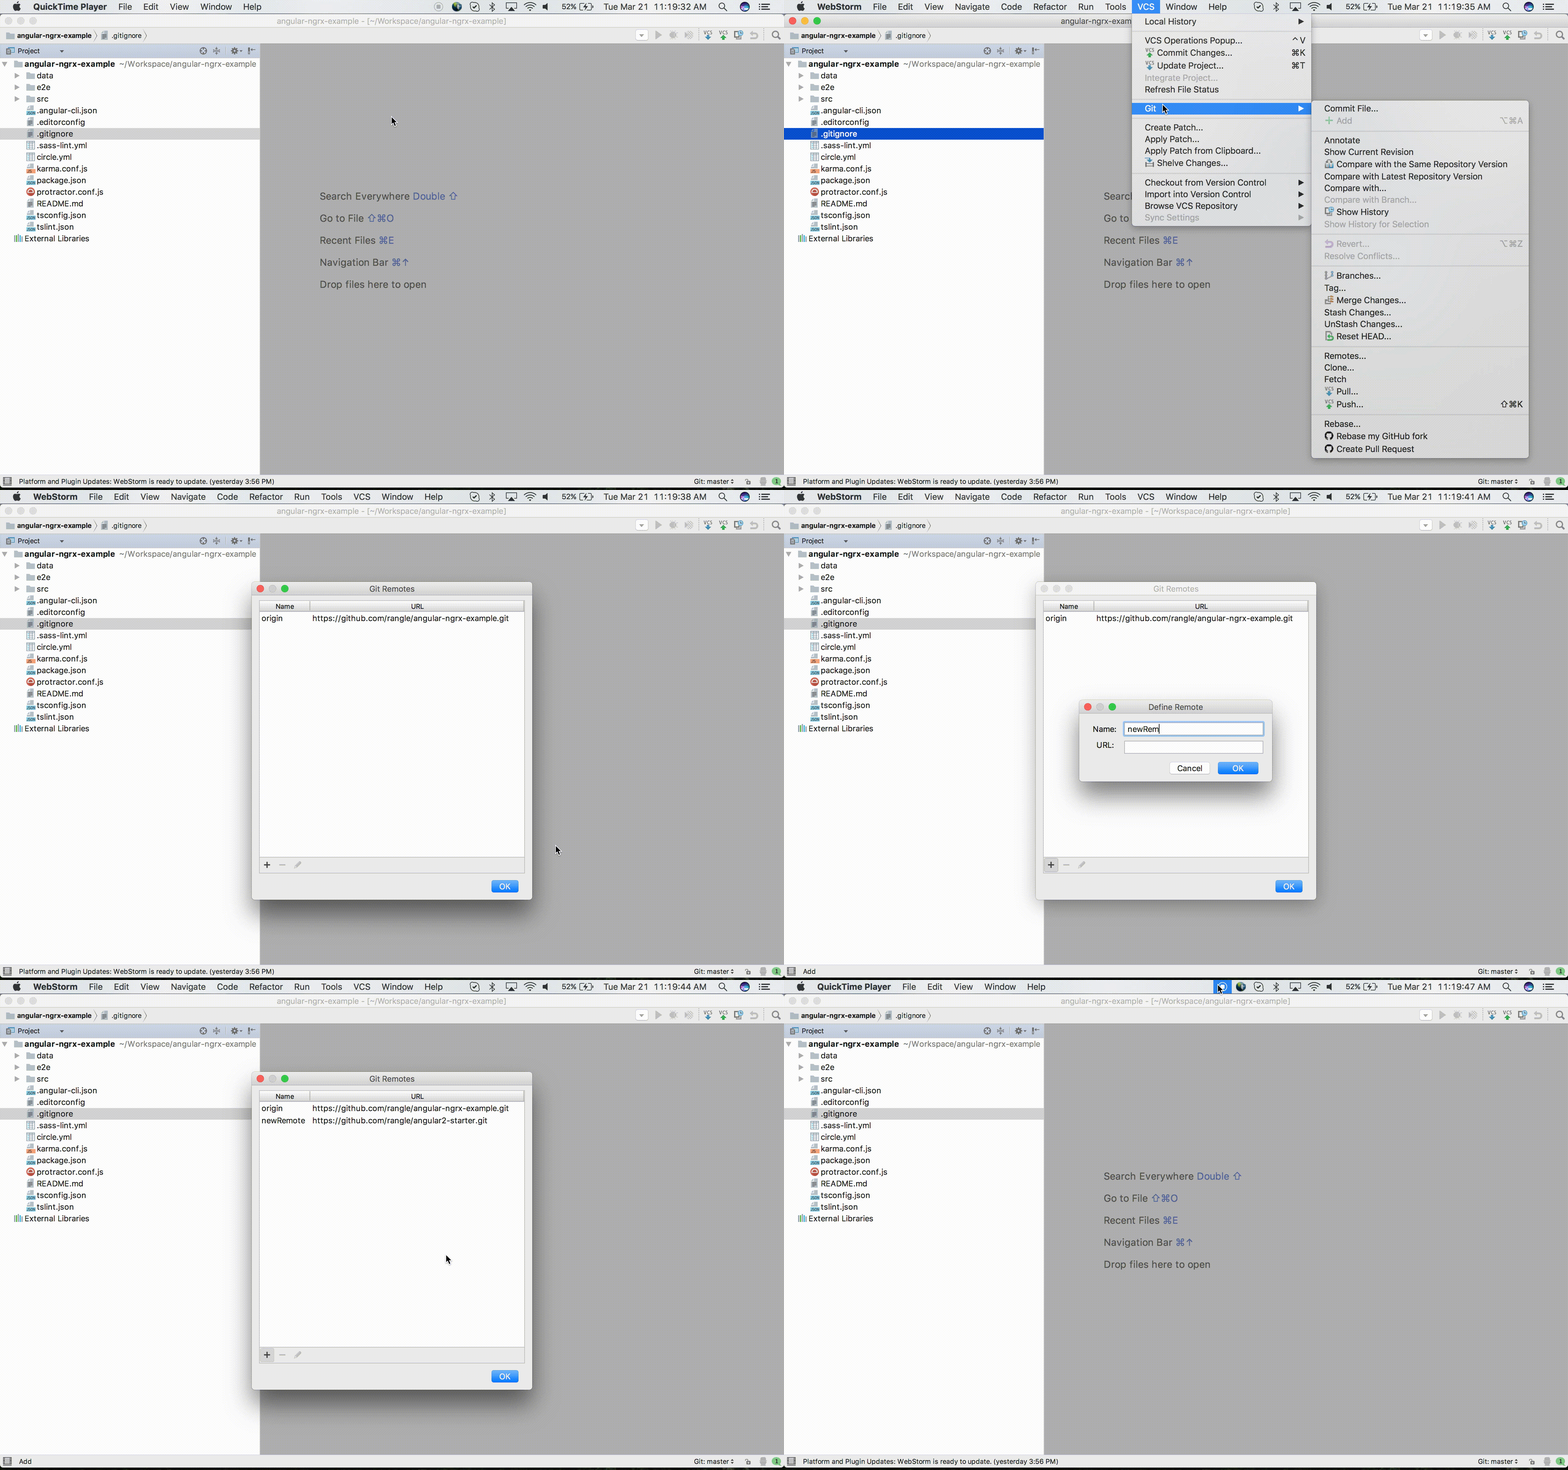
- From the main menu, choose VCS | Git | Remotes. The Git Remotes dialog will open.
- Click the Add button
+on the toolbar or press⌘N. - In the dialog that opens, specify the remote name and URL and click OK.

How to Rebase within Webstorm
Git integration with WebStorm supports the Rebase operation and provides an interface that ensures high flexibility in setting the rebase arguments.
The following functionality is supported:
- The basic use case which involves applying a branch on top of the current HEAD of the master after synchronization with the upstream.
- Rebasing a branch entirely or partially to a specific commit in any branch or tag.
- Running rebase on several local repositories simultaneously.
- Selecting a merge strategy to apply, with the possibility to use no merging strategy at all.
- Running rebase interactively with control over preserving/squashing merges.
- Resuming interrupted rebase after merge conflicts are resolved.
- Cancelling rebase.
To initiate a rebase operation
- From the main menu, select VCS | Git | Rebase. The Rebase Branches dialog box opens.
- From the Git Root drop-down list, select the relevant local repository.
- From the Branch drop-down list, select the branch you want to rebase. By default, the current branch is selected. If you specify a different branch, it will be checked out.
- Specify the new base and the commits you want to apply.
- If necessary, choose a rebase strategy and click Rebase.
The rebase command is also available from the Git Branches popup in the submenu for the selected branch.
To resume an interrupted rebase operation
-
From the main menu, choose VCS | Git | Continue Rebasing.
Before resuming the rebase operation, view the log in the Version Control tool window.
If rebase was initiated and interrupted on two or more local repositories, the Continue Rebasing dialog box is displayed. Select the repository on which you want to resume the rebase operation from the Git Root drop-down list.
To cancel a rebase operation
- From the main menu, choose VCS | Git | Abort Rebasing.
If rebase was initiated on two or more local repositories, the Abort Rebasing dialog box is displayed. Select the repository on which you want to cancel the rebase operation from the Git Root drop-down list.
Creating a new branch
Creating new branches is important for keeping a clean development cycle. Without overlapping features it become easy to isolate problems without compromising any other work done.

To create a new Git branch
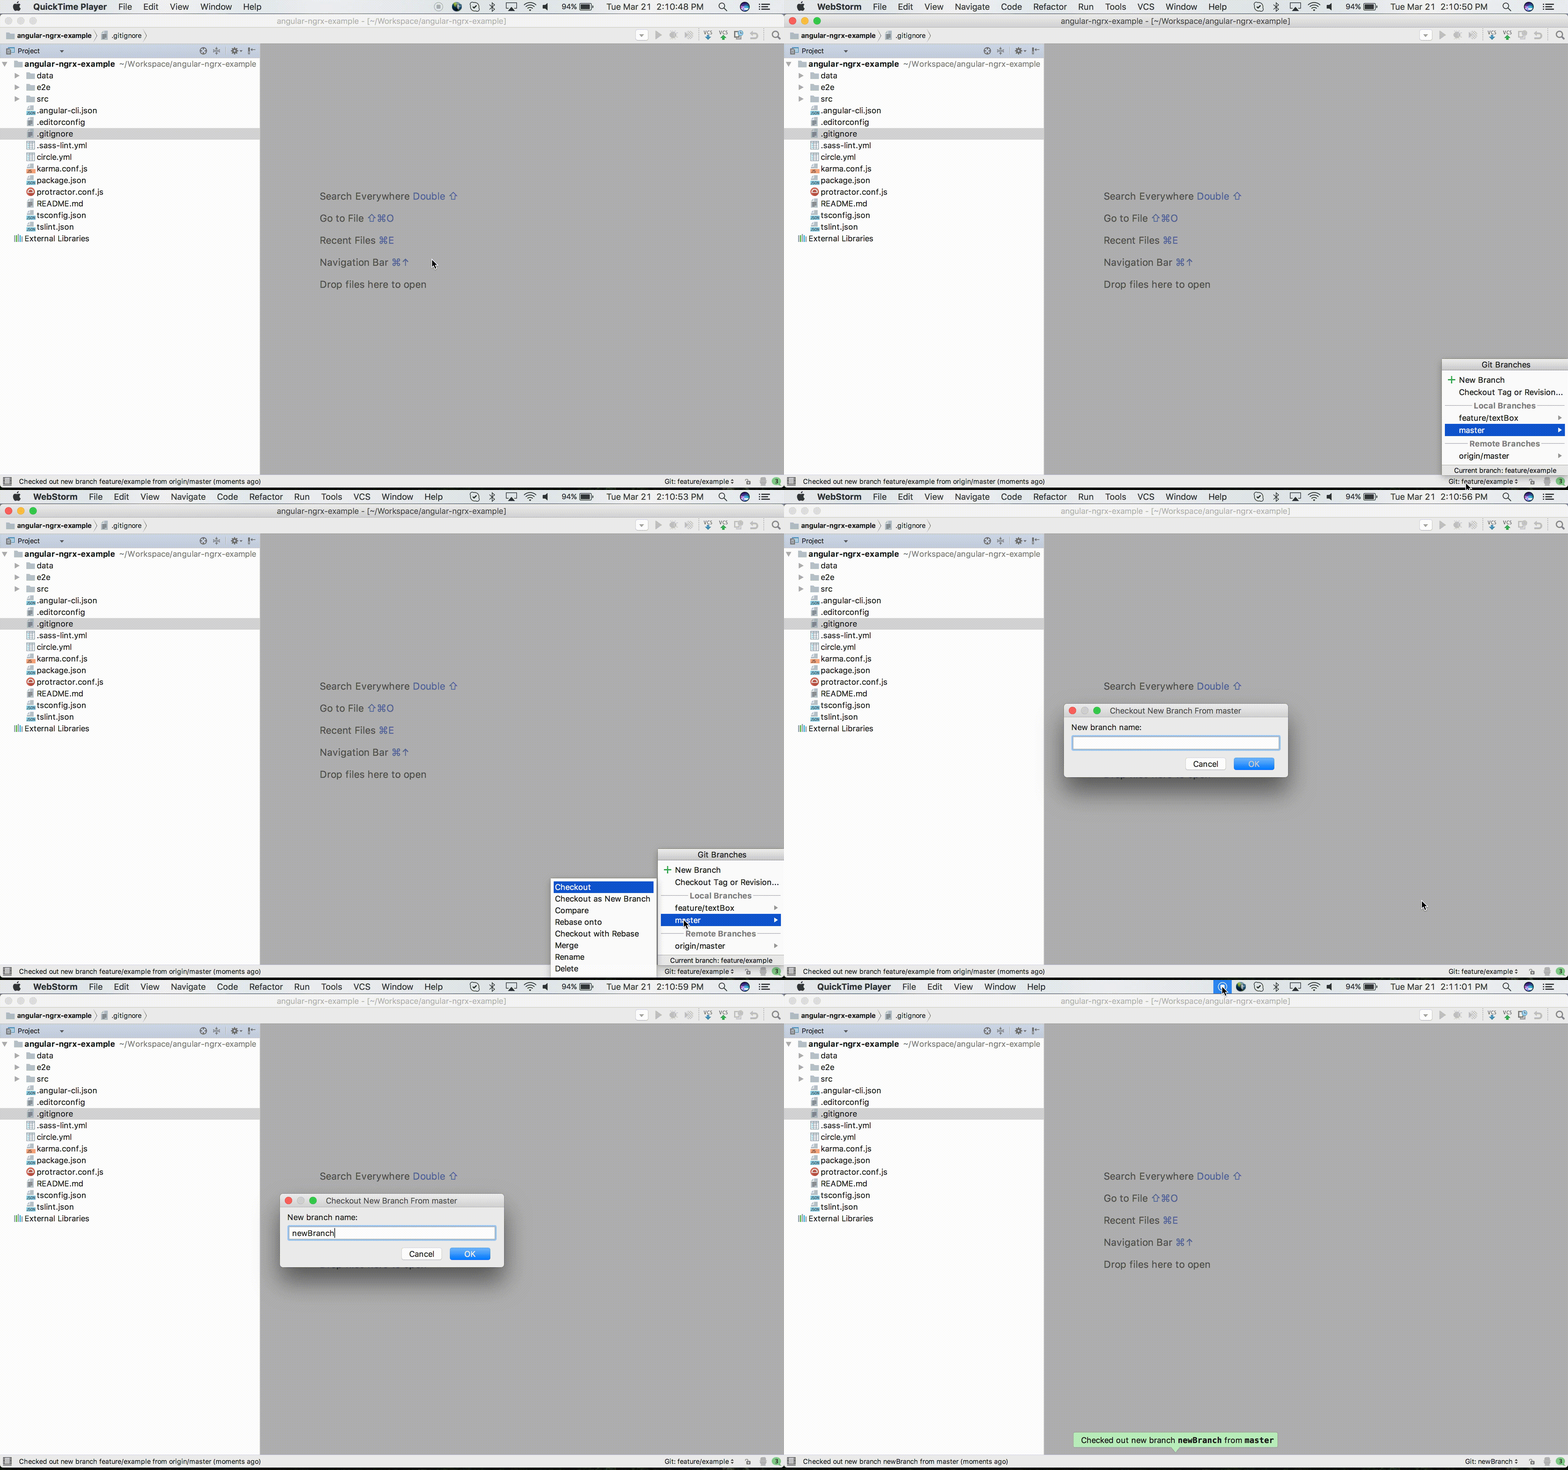
- Invoke the Branches menu as described in Accessing Git Branches Popup Menu.
- In the pop-up menu, choose New Branch.
- In the Create new branch dialog box, specify the branch name. The branch with the specified name will be checked out (corresponds to
git checkout -b).
To check out a new Git branch from a local branch
- Invoke the Branches menu as described in Accessing Git Branches Popup Menu.
- Select a branch in the pop-up list that shows all available local and remote branches, and choose Checkout as new branch from the submenu.
- Specify the branch name in the Create new branch dialog that opens.
To check out a new local branch from a remote branch
- Invoke the Branches menu as described in Accessing Git Branches Popup Menu.
- Select a branch in the pop-up list that shows all available local and remote branches, and choose Checkout as new local branch from the submenu.
- Specify the name of the new branch in the Checkout new branch from
branch namedialog that opens. The branch with the specified name will be checked out and put under version control.
Creating a Pull Request
Creating pull requests is a nice way to follow the collaborative development workflow. With it you can tell others about the changes you’ve made and ask for comments, review, or just share the knowledge. With all this going on, a pull request appears in the original repository only after approval. A pull request can be prepared right from WebStorm without switching to the browser.
To create a pull request:
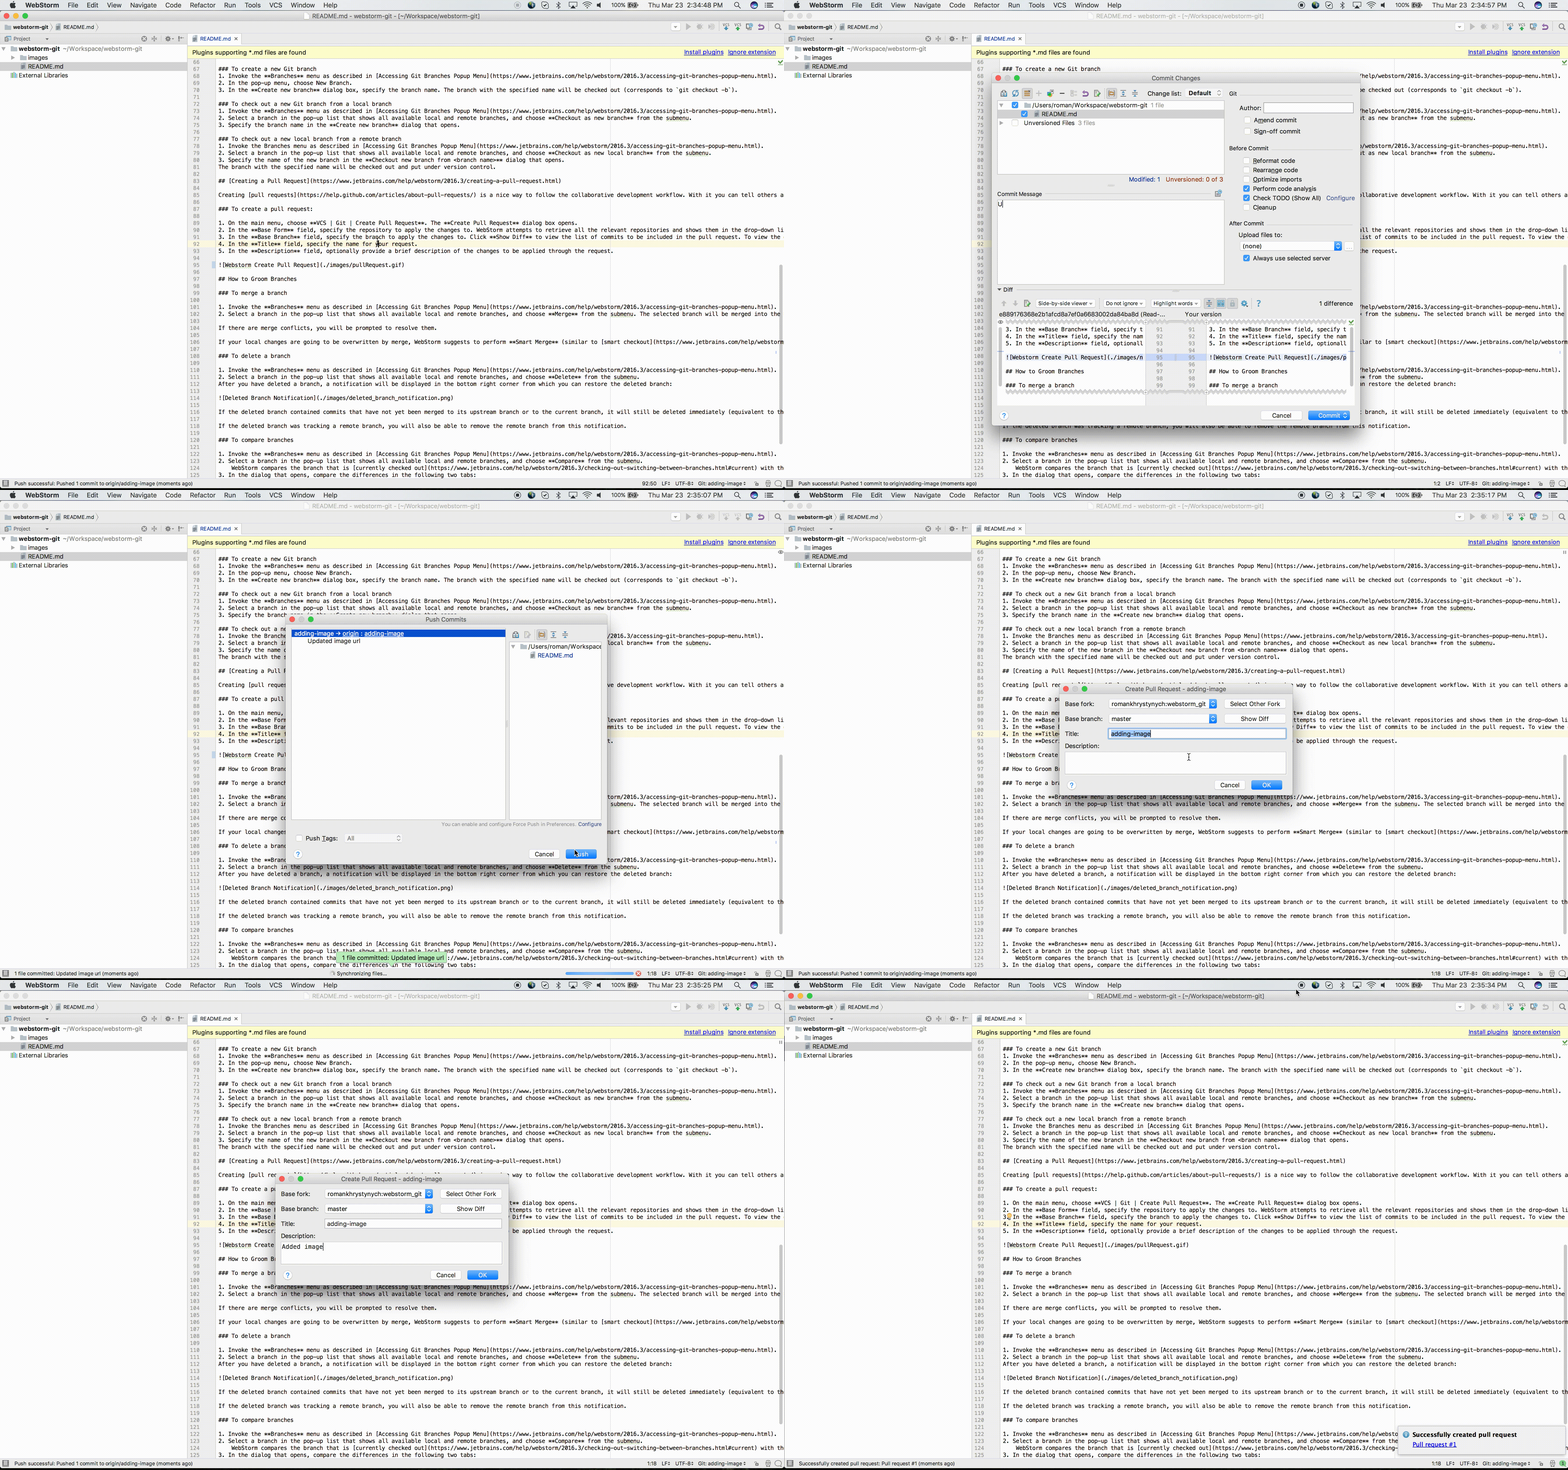
- On the main menu, choose VCS | Git | Create Pull Request. The Create Pull Request dialog box opens.
- In the Base Form field, specify the repository to apply the changes to. WebStorm attempts to retrieve all the relevant repositories and shows them in the drop-down list. Choose the repository from the drop-down list or click Select Other Fork and from the Form Owner drop-down list choose the name of the user who is the owner of the target repository.
- In the Base Branch field, specify the branch to apply the changes to. Click Show Diff to view the list of commits to be included in the pull request. To view the details of a commit, select it and switch to the Log tab which shows a list of files included in the selected commit list. See also Merging, Deleting, and Comparing Branches.
- In the Title field, specify the name for your request.
- In the Description field, optionally provide a brief description of the changes to be applied through the request.

How to Groom Branches
To merge a branch
- Invoke the Branches menu as described in Accessing Git Branches Popup Menu.
- Select a branch in the pop-up list that shows all available local and remote branches, and choose Merge from the submenu. The selected branch will be merged into the branch that is currently checked out.
If there are merge conflicts, you will be prompted to resolve them.
If your local changes are going to be overwritten by merge, WebStorm suggests to perform Smart Merge (similar to smart checkout).
To delete a branch
- Invoke the Branches menu as described in Accessing Git Branches Popup Menu.
- Select a branch in the pop-up list that shows all available local and remote branches, and choose Delete from the submenu. After you have deleted a branch, a notification will be displayed in the bottom right corner from which you can restore the deleted branch:

If the deleted branch contained commits that have not yet been merged to its upstream branch or to the current branch, it will still be deleted immediately (equivalent to the git branch --D or git branch --delete --force command), but the notification will also contain a link allowing you to view the unmerged commits.
If the deleted branch was tracking a remote branch, you will also be able to remove the remote branch from this notification.
To compare branches
- Invoke the Branches menu as described in Accessing Git Branches Popup Menu.
- Select a branch in the pop-up list that shows all available local and remote branches, and choose Compare from the submenu. WebStorm compares the branch that is currently checked out with the selected branch.
- In the dialog that opens, compare the differences in the following two tabs:
- Log: this tab lists the commits that exist in the current branch, and are missing in the selected branch, and vice versa.
- Diff: this tab shows the differences between files existing in both branches. Use the Show Diff command on the context menu of a file to explore the differences between branches.
Conclusion
This article covered the basic git functionality we use at Rangle.io within WebStorm IDE. We looked at how to conduct basic functions such as adding remotes, creating new branches, creating pull requests, rebasing and grooming git. Remember, most of these functionalities can be accessed through the bottom right corner of WebStorm through the Git Branches Popup Menu. To get familiar with the follow it is important follow to practice the process. Good luck!

Written by Roman Khrystynych who lives and works in Toronto building interesting things.